Okay, let me set the scene for you. You know that moment when you walk into a kitchen and the air is just *warm* with the smell of melting butter and brown sugar, with this hint of cinnamon and earthy carrot sweetness floating through? That’s the magic of my candied carrots recipe starting to happen right on your stovetop. It’s honestly one of my favorite side dishes ever because it takes this humble, sometimes overlooked vegetable and turns it into this sticky, glossy, sweet-and-savory treat that everyone, and I mean *everyone*, ends up fighting over.
I’ve been tinkering with this classic recipe for years, ever since my Aunt Margie brought a version to our big Easter dinner. The platter was scraped clean before the ham even got carved! That’s when I knew I had to perfect my own. My goal was always the same: carrots that are tender but not mushy, with a glaze that’s thick and syrupy enough to cling to every single slice. After more test batches than I care to admit (my neighbors were very well-fed), I finally landed on this simple, one-pan method. It’s become my secret weapon for making any weeknight dinner or holiday feast feel just a little bit more special.
Why You’ll Love These Candied Carrots
Trust me, this recipe is about to become your new go-to side dish. It’s one of those rare, perfect recipes that just checks every box.
- One pan, zero fuss. Everything cooks together in a single saucepan from start to that gorgeous, glossy finish. Less cleanup is always a win in my book.
- Ready in a flash. From peeling to serving, you’re looking at about 40 minutes total. It’s fast enough for a busy Tuesday but fancy enough for your holiday table.
- Pantry magic. It turns basic stuff you probably already have—carrots, butter, sugar, spices—into something that tastes truly special.
- The perfect sweet-savory bite. It’s not cloying, it’s not boring. It’s that incredible balance that has kids and adults reaching for seconds every single time.
Candied Carrots Ingredients
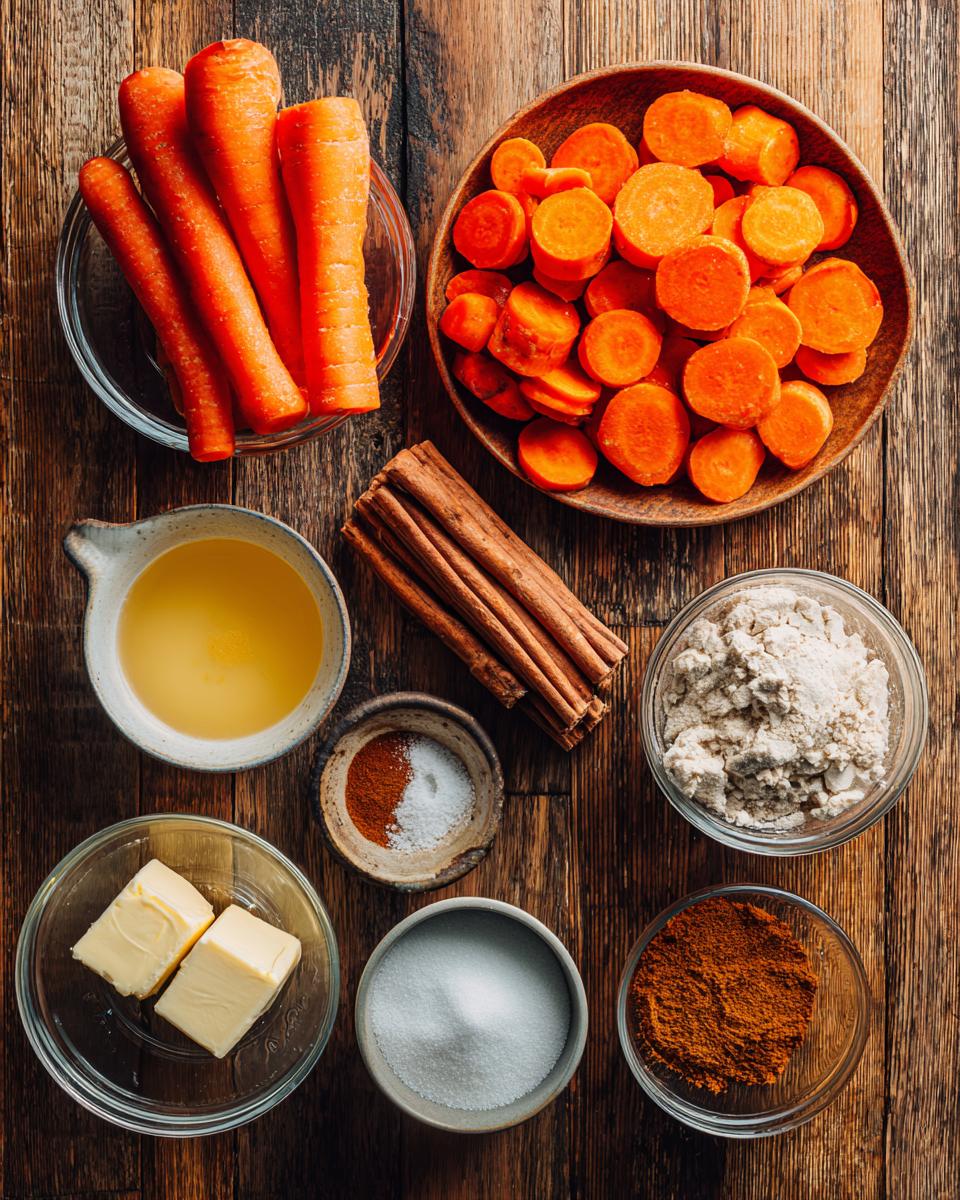
This is where the magic starts, and honestly, keeping it simple is the whole secret. You don’t need a shopping cart full of fancy stuff. Just gather these basic ingredients and you’re minutes away from something amazing.
- 1 pound (450g) carrots, peeled and sliced into 1/4-inch rounds or sticks
- 3 tablespoons unsalted butter
- 1/4 cup packed brown sugar
- 2 tablespoons granulated sugar
- 1/4 cup water or orange juice
- 1/2 teaspoon ground cinnamon
- 1/4 teaspoon ground nutmeg
- 1/4 teaspoon salt
I can’t stress this enough: grab fresh, firm carrots from the produce section. They have so much more natural sweetness and moisture than the pre-cut bagged ones, and that makes all the difference in your final glaze.
Ingredient Notes & Simple Swaps
Okay, real talk from my kitchen to yours. I make this recipe all the time, and sometimes you just have to work with what’s in the fridge. Here’s how to swap things without losing that perfect candied carrot vibe.
First, the carrots. If you have a bag of baby carrots, you’re golden! Just toss them in whole, or if they’re big, halve them lengthwise. They might need a few extra minutes to get tender, so just keep an eye on them. Out of brown sugar? A couple tablespoons of pure maple syrup or honey stirred in with the other liquids is a fantastic fix—it adds a really nice, deep flavor.
Now, the liquid. Using water gives you a pure, sweet buttery glaze. But if you use orange juice? Wow. It adds this bright, citrusy note that cuts through the sweetness so beautifully. It’s my personal favorite for holiday dinners. And if you want to play with the spices, a tiny pinch of ground ginger or allspice alongside the cinnamon and nutmeg is a wonderful little twist. The basics here are so forgiving, so don’t be afraid to make it your own!
Essential Equipment for Candied Carrots
One of the best things about this recipe? You don’t need any fancy gadgets. I literally make it with the same basic tools I use for everything else. Just grab a medium saucepan with a tight-fitting lid—this is your workhorse for the whole process. You’ll also want a wooden spoon or spatula for stirring (it’s gentle on the glaze), a vegetable peeler, a sharp knife, and a cutting board for prepping the carrots. That’s it! You’re all set to get cooking.
How to Make Candied Carrots: Step-by-Step Guide
Alright, here’s where the fun really starts. I know a recipe can look like just a list of steps, but trust me, there’s a little rhythm to this dance. Once you get it, you’ll be making these carrots without even thinking. It’s all about two main phases: first, we get the carrots nice and tender, and second, we turn all that lovely liquid into a sticky, shiny glaze. Let’s walk through it together.
Step 1: Prepare Your Carrots and Pan
First things first, let’s get those carrots ready. I like to peel them—it just makes for a smoother, prettier finish, you know? Then, slice them into rounds about a 1/4-inch thick. If you’re feeling fancy, you can do sticks instead. The key here is to try and make them all roughly the same size. Why? Because we want every single piece to cook at the same rate. Nobody wants a mix of mushy and crunchy carrots! Once they’re all sliced, just dump them right into your saucepan. No need to get another bowl dirty. This is your one-pan wonder starting right now.
Step 2: Combine and Simmer to Tenderize
This is the “set it and forget it” part, but you gotta watch it for a minute at the start. Pour in your water or orange juice, then plop in the butter, both sugars, the cinnamon, nutmeg, and salt. Give it a quick stir just to mix everything around the carrots. Now, crank the heat to medium-high and bring it to a good, rolling boil. You’ll see bubbles forming all over. As soon as it’s boiling, immediately turn the heat down to low so it’s just maintaining a gentle simmer. Clap that lid on tight and set your timer for 15 minutes.
This covered simmering time is magic. The steam and heat work together to soften the carrots perfectly. Don’t lift the lid to peek! Just let it do its thing. After 15 minutes, grab a fork and carefully poke a carrot piece. It should slide in with almost no resistance. If it’s still a bit firm, give it another 5 minutes with the lid on. They need to be tender before we move on, or they won’t absorb the glaze properly.
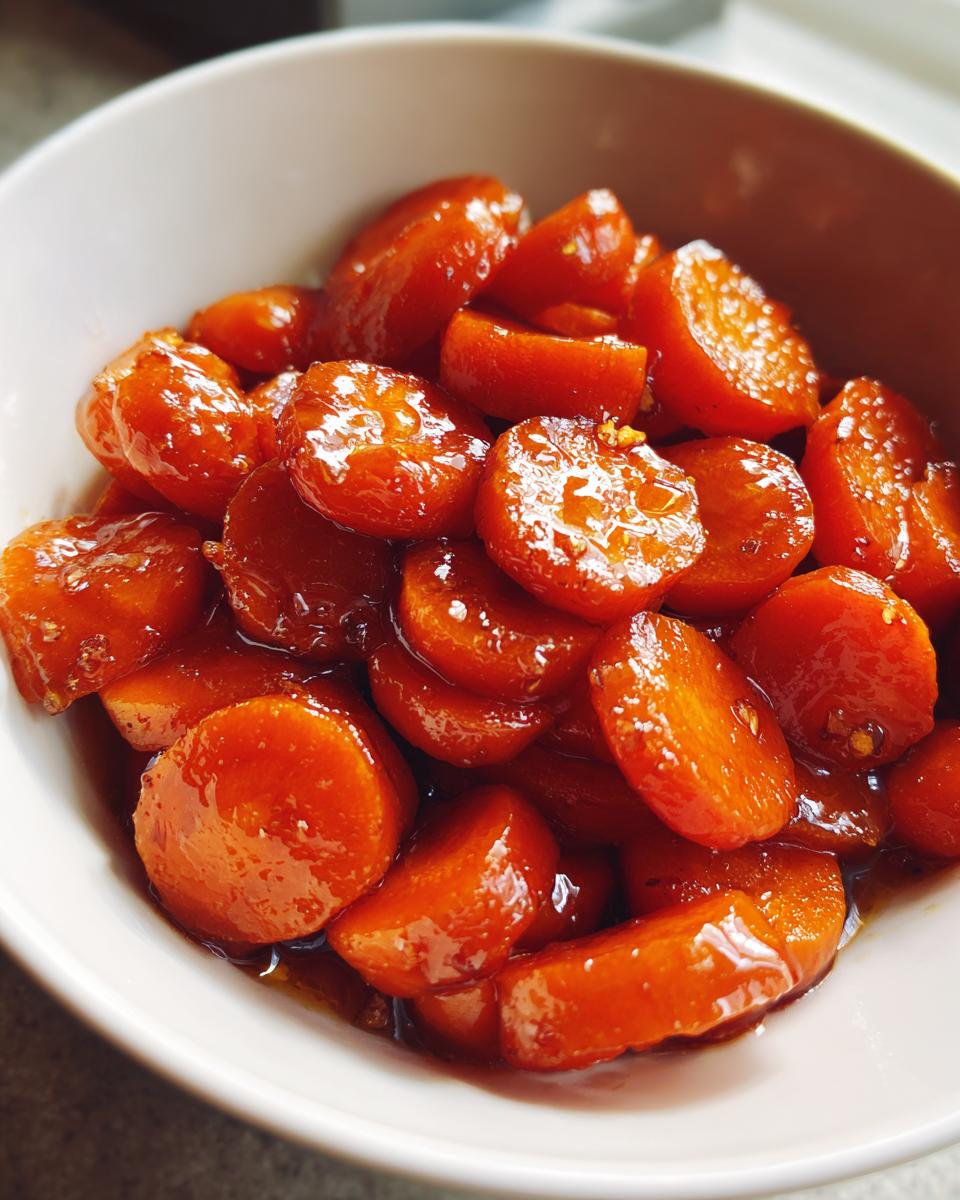
Step 3: Reduce to a Glossy Glaze
Okay, here comes the exciting part! Take the lid off—careful, that steam is hot! You’ll see there’s still quite a bit of thin, watery liquid in the pan. That’s perfect. Turn the heat up to medium. Now, we’re going to let that liquid bubble away and reduce, which means it’ll get thicker and thicker as the water evaporates.
Start stirring gently but pretty frequently. At first, it’ll just look like carrots swimming in juice. But after about 5 minutes, you’ll notice the bubbles get bigger and slower, and the liquid will start to look syrupy. This is when you need to watch it like a hawk and stir almost constantly. Another 3-5 minutes, and it’ll transform. The sauce will thicken dramatically and start clinging to the carrots, making them look all shiny and gorgeous. To test it, lift your spoon out of the pan. The glaze should coat the back of it and drip off slowly, like warm honey. Once you see that, you’re done! Take it off the heat immediately—the residual heat will thicken it even more as it cools. And just like that, you’ve made the most beautiful, glossy candied carrots.
My Top Tips for Perfect Candied Carrots
After making this recipe more times than I can count, I’ve picked up a few little tricks that make all the difference between good candied carrots and knock-your-socks-off amazing ones. These are my go-to secrets for getting it right every single time.
First, give your carrots some space in the pan. If you try to double the recipe in the same pot, they’ll steam instead of glaze properly. Trust me on this. Next, you’ve gotta resist the urge to lift that lid while they’re simmering! I know it’s tempting, but you’ll let all the precious steam out. Let them get tender in peace. The fork test is your best friend—if it doesn’t slide in easily, give them a few more minutes.
And here’s a big one: the glaze will keep thickening once you take it off the stove. So pull the pan off the heat when it’s still a tiny bit runnier than you think you want. It sets up perfectly as it sits. Oh, and my favorite personal twist? If you use orange juice, toss in a teaspoon of fresh orange zest with the spices. It adds this incredible, sunny brightness that makes the whole dish sing.
Serving and Storing Your Candied Carrots
Now for the best part: getting these gorgeous carrots on the table and then, let’s be real, figuring out what to do with any leftovers (if you’re lucky enough to have some!). This dish is so versatile, it can dress up a simple Tuesday dinner or hold its own on a holiday spread.
Best Ways to Serve Candied Carrots
I love how these carrots play well with so many different mains. They’re absolutely perfect next to a simple roasted chicken or turkey—that sweet glaze is just made for poultry. For a holiday feast, they’re a stunning partner to a glazed ham or a savory beef roast. To finish them off, a little sprinkle of chopped fresh parsley adds a pop of color and freshness, or my secret trick is a tiny grind of black pepper right on top. The pepper gives you this little savory kick that cuts through the sweetness in the most delicious way.
Storage and Reheating Instructions
If you do end up with leftovers, just let them cool completely and pop them into a sealed container in the fridge. They’ll keep beautifully for 3 to 4 days. To reheat, my favorite way is to toss them back into a saucepan over low heat with just a splash of water to loosen the glaze back up. You can also warm them gently in the microwave, covered with a damp paper towel to keep them from drying out. They might not be quite as glossy as the first day, but I promise they’ll still taste incredible!
Candied Carrots Nutritional Information
I know a lot of us like to have an idea of what we’re eating, so here’s a quick look at the nutritional breakdown for one serving of these candied carrots. Remember, this is just an estimate to give you a ballpark figure—the exact numbers can change a bit depending on the specific brand of butter or carrots you use, or if you swap in something like maple syrup.
For about a quarter of the recipe, you’re looking at roughly 180 calories, with 9g of fat (5.5g saturated), 27g of carbohydrates (that includes 22g of sugar and 3g of fiber), and 1g of protein. It also has about 220mg of sodium. So while it’s a sweet treat of a side dish, a little goes a long, delicious way!
Your Candied Carrots Questions Answered
I get it—questions pop up whenever you’re trying a new recipe! Here are the answers to the ones I hear most often about these candied carrots. Hopefully, this makes your cooking adventure even smoother.
Can I make candied carrots ahead of time?
Absolutely, and it’s a great holiday time-saver! You can cook them completely, let them cool, and store them in the fridge for up to two days. Reheat them gently in a pan with a tiny splash of water to bring the glaze back to life. The flavor actually gets even better as it sits!
Can I use frozen carrots?
You can, but I really recommend fresh if possible. Frozen carrots tend to release more water as they thaw, which can make your glaze too thin and take forever to reduce. If it’s all you have, don’t thaw them first—just add a few extra minutes to the simmering time to ensure they’re tender.
Why is my glaze too thin?
Don’t worry, this happens! It usually means you took the carrots off the heat a bit too early. Just keep simmering them uncovered over medium heat, stirring constantly. The liquid needs to bubble away until it becomes a thick, syrupy coating that clings to your spoon.
Is this recipe freezer-friendly?
Honestly, I don’t recommend freezing them. The texture of the carrots can become a bit mushy and watery when thawed, and the lovely glossy glaze just doesn’t come back the same way. They’re so quick to make fresh, it’s really worth it!
Can I make this recipe without butter?
For sure! You can swap in a plant-based butter alternative with great results. The flavor and richness will be a little different, but you’ll still get a delicious, sweet glaze. Just avoid using oil, as it won’t create the same creamy, clinging sauce.
Make This Candied Carrots Recipe Today
So, what are you waiting for? Grab that saucepan and a pound of carrots—your new favorite side dish is about 40 minutes away. I’m telling you, that first sweet, buttery, fork-tender bite is pure happiness. I’d love to hear how it turns out in your kitchen! Did you try the orange juice trick? Add a pinch of ginger? Tag me or drop a comment below to share your results. Now go get cooking!
Print
Candied Carrots
- Total Time: 40 minutes
- Yield: 4 servings 1x
- Diet: Vegetarian
Description
Candied carrots are a sweet and savory side dish where carrots are glazed with a simple syrup made from sugar, butter, and spices, resulting in tender, glossy, and flavorful vegetables.
Ingredients
- 1 pound (450g) carrots, peeled and sliced into rounds or sticks
- 3 tablespoons unsalted butter
- 1/4 cup packed brown sugar
- 2 tablespoons granulated sugar
- 1/4 cup water or orange juice
- 1/2 teaspoon ground cinnamon
- 1/4 teaspoon ground nutmeg
- 1/4 teaspoon salt
Instructions
- Place the prepared carrots in a medium saucepan.
- Add the water or orange juice, butter, brown sugar, granulated sugar, cinnamon, nutmeg, and salt to the pan.
- Bring the mixture to a boil over medium-high heat, then reduce the heat to maintain a simmer.
- Cover the pan and cook for 15-20 minutes, or until the carrots are fork-tender.
- Remove the lid and increase the heat to medium. Cook, stirring frequently, for 5-10 more minutes until the liquid reduces to a thick, syrupy glaze that coats the carrots.
- Serve the candied carrots warm, spooning any remaining glaze from the pan over the top.
Notes
- You can use baby carrots instead of sliced carrots; adjust the cooking time slightly.
- For a citrus twist, add a teaspoon of orange zest with the spices.
- The glaze will thicken further as it cools.
- Leftovers can be stored in a sealed container in the refrigerator for up to 4 days.
- Prep Time: 10 minutes
- Cook Time: 30 minutes
- Category: Side Dish
- Method: Stovetop
- Cuisine: American
Nutrition
- Serving Size: 1/4 of recipe
- Calories: 180
- Sugar: 22g
- Sodium: 220mg
- Fat: 9g
- Saturated Fat: 5.5g
- Unsaturated Fat: 2.5g
- Trans Fat: 0g
- Carbohydrates: 27g
- Fiber: 3g
- Protein: 1g
- Cholesterol: 25mg