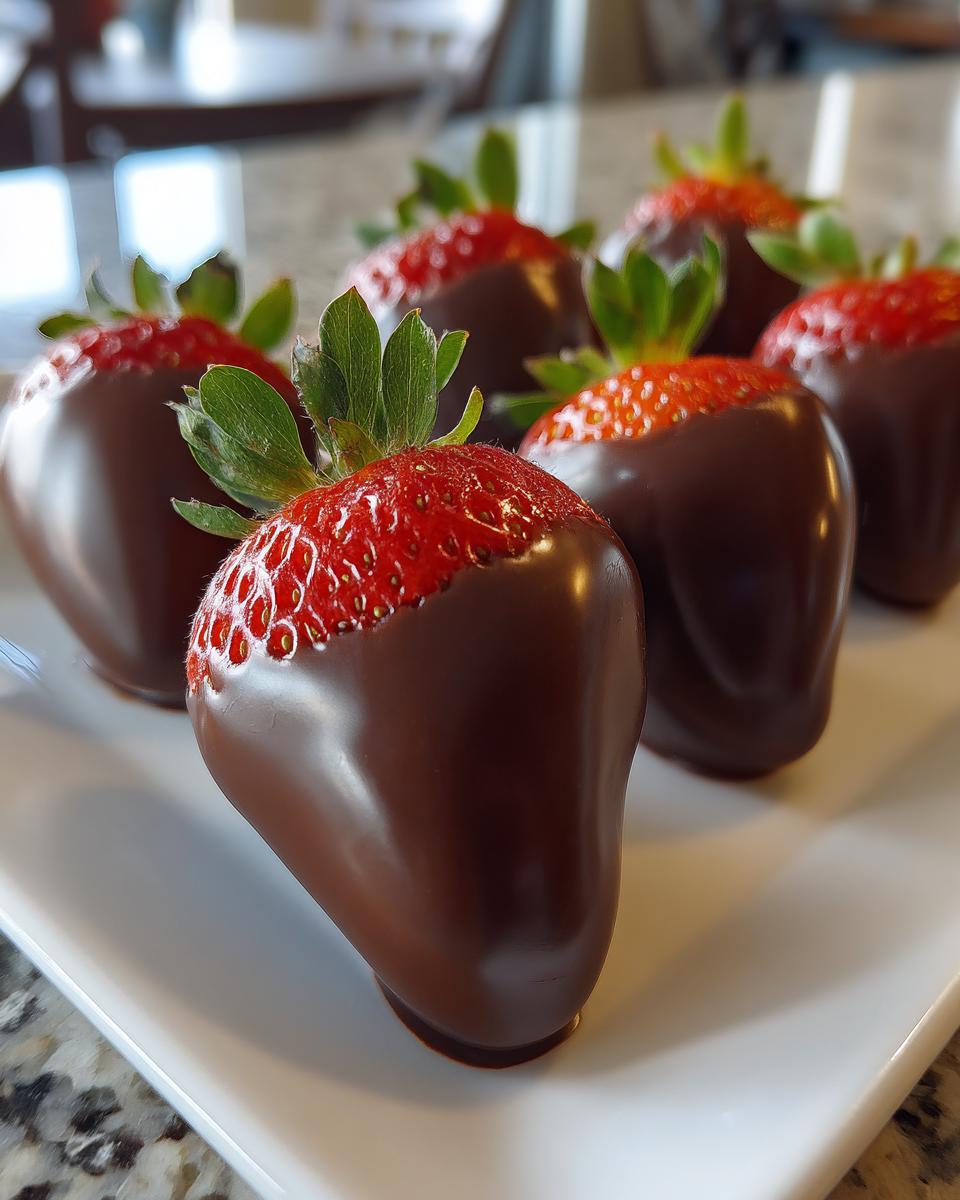
Okay, let’s be real for a second. Is there any dessert that screams “fancy” but is secretly so simple it’s almost silly? I don’t think so. For me, that title will always belong to chocolate-covered strawberries. They look like you ordered them from a boutique chocolatier, but the truth is, you can make a stunning batch in your own kitchen in about 20 minutes flat. I’m talking about that perfect “snap” of dark chocolate giving way to a juicy, sweet berry. It’s pure magic.
I’ve been making these for years, ever since I decided to whip up a last-minute Valentine’s Day treat instead of buying an overpriced box. My first attempt was… well, let’s just say the chocolate was a bit lumpy and the strawberries were suspiciously damp. But after a lot of trial and error (and a few chocolate-seizing disasters), I’ve nailed down the foolproof method. You really only need two things: fantastic strawberries and good chocolate. That’s it! I’m going to walk you through my hard-earned secrets, from picking the perfect berries to getting that glossy, professional-looking chocolate coat every single time. Trust me, once you see how easy it is, you’ll be making these for every occasion.
Why You Will Love These Chocolate-Covered Strawberries
Honestly, what’s not to love? This is one of those recipes that feels like you’re getting away with something. Here’s why I make them all the time, and why you will, too:
- They’re shockingly easy. If you can melt chocolate and dip something, you’ve got this. No fancy skills required.
- You make them your own. Go classic with dark chocolate, or get wild with drizzles, sprinkles, or chopped nuts. It’s your canvas!
- Instant elegance. Place these on a platter and suddenly any Tuesday dinner feels like a celebration. They are my go-to for impressing guests without stress.
- So much fun to make. Seriously, get the kids involved or make it a date night activity. Dipping and decorating is just pure, simple joy.
Chocolate-Covered Strawberries Ingredients
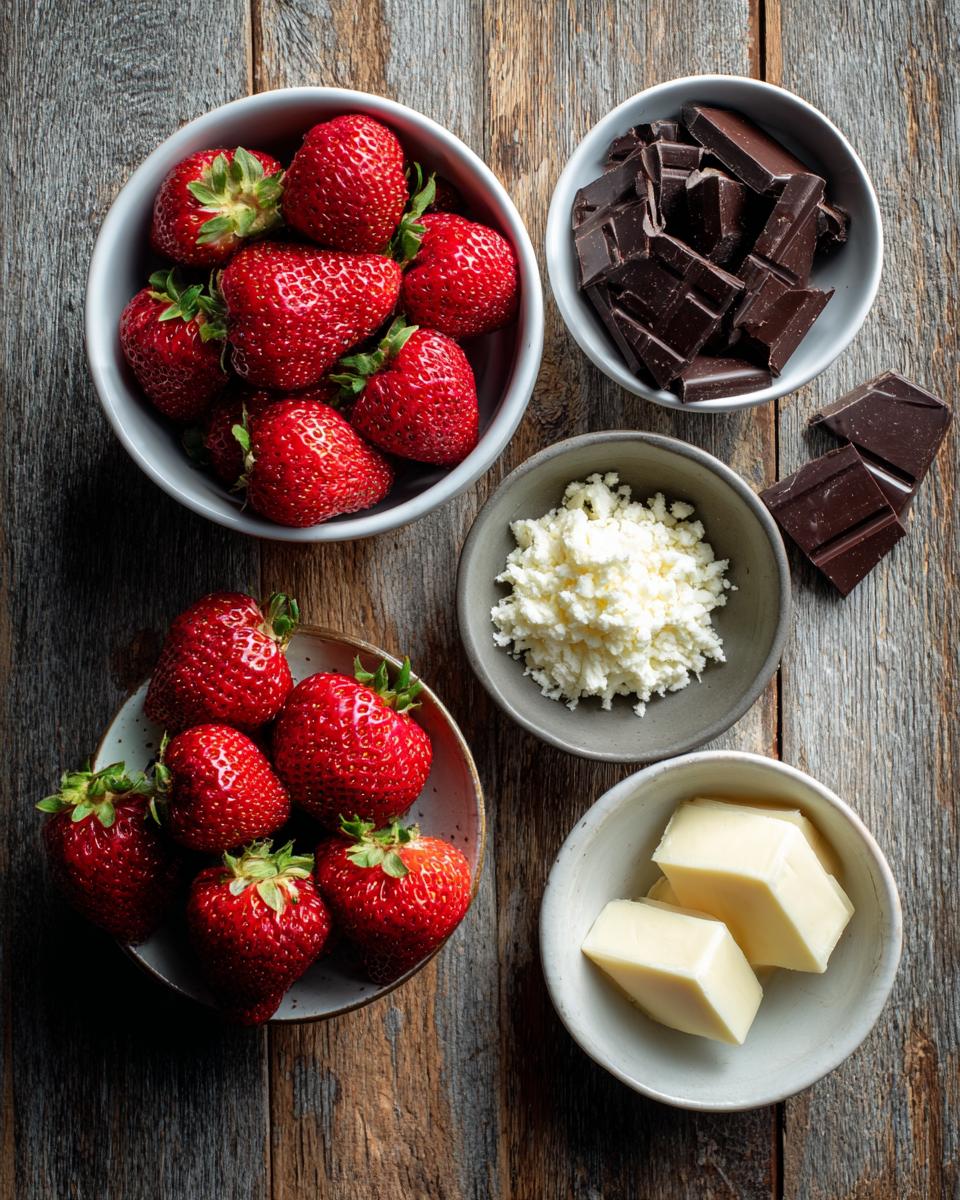
Here’s the beautiful part: the ingredient list is short and sweet. You only need two core things to make magic happen. I promise, using the best you can find here makes all the difference.
- 1 pound (about 450g) fresh strawberries, washed and dried THOROUGHLY. Look for bright red, firm berries with fresh green tops.
- 8 ounces (about 225g) high-quality chocolate bars, chopped (dark, milk, or white). I’m talking about the good baking bars, not chips! We’ll get into why in a second.
- 1 teaspoon coconut oil or refined vegetable shortening (optional, for a thinner coating). This little trick gives you that perfect, professional drip.
The best part? This whole recipe is naturally vegetarian-friendly. Let’s talk about why each piece matters.
Ingredient Notes & Simple Swaps
Okay, let’s break down why these specific ingredients are my non-negotiables.
First, the strawberries. That “dried THOROUGHLY” part isn’t a suggestion—it’s the law in my kitchen. Any tiny drop of water will make your beautiful melted chocolate seize up into a grainy, clumpy mess. It’s heartbreaking! I pat them dry with paper towels and then let them air-dry for a few extra minutes, just to be safe.
Now, the chocolate. You might be tempted to grab chocolate chips, but trust me on this: use bars meant for baking. Chocolate chips have stabilizers added so they keep their shape in cookies, which means they don’t melt as smoothly. Chopping up a bar gives you nice, even pieces that melt into a silky, dippable pool. The quality of your chocolate is the flavor, so pick one you love to eat on its own!
That teaspoon of coconut oil or shortening is my secret weapon. Adding just a bit thins the chocolate slightly, making it easier to get a smooth, even coat that drips off beautifully. It also gives the set chocolate a lovely shine.
Want to get creative? For fun colors, you can swap the chocolate for candy melts or almond bark. They melt beautifully and come in every color under the sun! If you’re using white chocolate, a drop of alcohol-free vanilla or a pinch of salt can really make the flavor pop. See? So many ways to make it yours.
Essential Tools for Perfect Chocolate-Covered Strawberries
You don’t need any fancy gadgets for this, I promise! Just gather these few basic things from your kitchen, and you’re all set. Having everything ready before you start is half the battle.
- A baking sheet lined with parchment paper. This is your landing pad and makes cleanup a dream.
- A microwave-safe bowl (my lazy-day favorite) or a double boiler for the purists. Both work great for melting.
- A fork or a simple dipping tool. I usually just use a fork—it’s perfect for guiding the berry out of the chocolate.
That’s really it! Now let’s get to the fun part.
How to Make Chocolate-Covered Strawberries: Step-by-Step
Alright, this is where the magic happens! The process is simple, but a few key moves make all the difference between a homemade treat and a professional-looking masterpiece. I’ve broken it down into the exact steps I follow every single time. Grab your prepped berries and let’s turn them into something gorgeous.
Prepare Your Strawberries
This step is your foundation. Give each strawberry a gentle rinse under cool water. Now, here’s the most important part: you have to dry them like your chocolate’s life depends on it—because it does! I lay them out on a big stack of paper towels and pat them down firmly. Then, I let them sit for a few minutes to make sure every last bit of moisture on the surface has evaporated. Seriously, not a single drop can remain. If you’re in a hurry, you can even use the stem like a little handle and give each berry a careful twirl. A completely dry berry is your first secret to perfect chocolate adhesion.
Melt the Chocolate Correctly
This is where a lot of people get nervous, but don’t be! If you’re using the microwave (my go-to for speed), put your chopped chocolate in a microwave-safe bowl. Zap it for just 30 seconds, then take it out and stir. It won’t look melted yet, and that’s okay! Do another 30 seconds, stir again. Keep going with these short bursts and lots of stirring until it’s just smooth and glossy. Rushing this with high heat is how you burn chocolate, and burnt chocolate is sad chocolate. If you prefer the stovetop, use a double boiler: place a heatproof bowl over a pot of gently simmering water (make sure the bowl doesn’t touch the water) and stir until melted. Easy does it!
Dip and Set the Strawberries
The fun part! Hold a strawberry firmly by its green leaves (or the very top if the stem is short). Dip it into your smooth chocolate, swirling it around to coat about three-quarters of the way up. Lift it out, and give it a gentle twist over the bowl to let the excess chocolate drip off. You want a nice, even coat, not a thick, globby one. Carefully place it on your parchment-lined baking sheet. Repeat with the rest! Now, let them set. If your kitchen is cool, you can leave them on the counter for about 30 minutes. If it’s warm or you’re impatient (like me), pop the whole tray into the fridge for 15-20 minutes until the chocolate is firm to the touch.
Adding Drizzles and Toppings
This is where you can really get creative! If you want that fancy drizzle, melt a small amount of a contrasting chocolate (white on dark is my favorite). Let it cool just slightly so it’s not super runny, then use a fork or a piping bag to zig-zag it over your set berries. For toppings like chopped nuts, sprinkles, or shredded coconut, you have to work fast! Sprinkle them on immediately after dipping, before the chocolate sets. I like to do a few with toppings and keep a few classically simple. There’s no wrong way to do it!
Expert Tips for the Best Chocolate-Covered Strawberries
After making these more times than I can count, I’ve picked up a few tricks that guarantee perfect results every single time. Here are my absolute must-know tips:
- Use room-temperature berries. Cold strawberries straight from the fridge can cause the warm chocolate to set too quickly and thicken, making it harder to get a smooth, thin coat.
- Work in a cool kitchen. Chocolate hates humidity and heat. If it’s a really warm day, I’ll even run the A/C for a bit before I start dipping to help the chocolate set nicely.
- Give them space. Don’t crowd the baking sheet! Leave a little room between each berry so they don’t stick together and you have space to add drizzles later.
- If your chocolate seizes (gets grainy and clumpy), don’t panic! Slowly stir in a teaspoon of warm coconut oil or vegetable shortening. It won’t be perfect, but it can often save the batch.
Storing and Serving Your Chocolate-Covered Strawberries
Okay, let’s talk about keeping these beauties perfect. First, storage: they absolutely must go in the fridge. Arrange them in a single layer on a plate or tray (I reuse that parchment-lined baking sheet!) and they’ll keep for about 1-2 days. Honestly, they’re best the day you make them, when the berry is super juicy and the chocolate has that perfect snap.
Now, for serving—this is the fun part! Pile them high on a pretty platter for a party; they disappear faster than you can say “more, please.” I love tucking a few next to a slice of cake for a fancy dessert, or boxing them up in a clear cellophane bag with a ribbon for the sweetest homemade gift. They just make everything feel special.
Chocolate-Covered Strawberries Nutritional Information
I know sometimes you’re curious about what’s in a treat, so let’s talk numbers for a second. I always like to give you a rough idea, but here’s my honest baker’s disclaimer: the exact nutrition can swing quite a bit depending on your choices. Are you using a 70% dark chocolate bar or a creamy milk chocolate? How big are your strawberries, really? Even the brand of chocolate can change things. So, please take the info from the recipe details as a helpful estimate per serving, not a strict rule. At the end of the day, you’re eating a beautiful piece of fruit dipped in real chocolate—that’s a win in my book. Enjoy it without overthinking!
Your Chocolate-Covered Strawberries Questions Answered
I’ve gotten so many questions from friends over the years, so let’s tackle the big ones! These are the things that always seem to come up, and knowing the answers will make you a chocolate-dipping pro.
Can I use frozen strawberries?
Oh, I wish! But honestly, no. Frozen strawberries thaw with way too much extra moisture, and that water will make your chocolate seize up into a clumpy mess. You really need fresh, dry berries for that perfect snap.
Help! My chocolate seized and got grainy. Can I fix it?
Don’t panic, it happens to everyone! The most likely culprit is a tiny bit of water getting in. Your best bet is to try and save it by stirring in a teaspoon of warm coconut oil or vegetable shortening. It might not be *perfectly* smooth again, but it’ll usually become dippable enough to finish the batch.
Can I make these ahead of time for a party?
You can, but timing is everything. They are truly at their glorious best the same day you make them. If you must, store them in a single layer in the fridge overnight. The chocolate might “sweat” a little when they come back to room temp, but they’ll still taste amazing.
Why isn’t my chocolate sticking to the strawberry?
This almost always means your berry wasn’t completely, bone-dry. Any moisture at all creates a barrier. Next time, be super thorough with those paper towels and let them air-dry a little longer. Room-temperature berries (not cold from the fridge) also help the chocolate cling better.
What are your favorite topping ideas?
I love playing with this! While the chocolate is still wet, try a light sprinkle of flaky sea salt, chopped pistachios, or toasted coconut. For a drizzle, melt a little white chocolate and zig-zag it over the dark. Crushed freeze-dried strawberries are a gorgeous and tasty finishing touch, too!
Make Your Chocolate-Covered Strawberries Today
So, what are you waiting for? Grab a carton of gorgeous berries and your favorite chocolate bar, and give it a try. I promise it’s easier than you think, and the result is pure, delicious magic. I’d love to see your creations! Snap a picture of your prettiest berry and tell me all about it in the comments below—or ask me anything if you get stuck. Now go on, get dipping!
Print
Chocolate-Covered Strawberries
- Total Time: 20 minutes
- Yield: About 20 strawberries 1x
- Diet: Vegetarian
Description
Chocolate-covered strawberries are a simple, elegant dessert. You can make them at home with fresh strawberries and melted chocolate.
Ingredients
- 1 pound fresh strawberries, washed and dried thoroughly
- 8 ounces high-quality chocolate (dark, milk, or white), chopped
- 1 teaspoon coconut oil or vegetable shortening (optional, for thinning)
Instructions
- Wash the strawberries and dry them completely. Any water will prevent the chocolate from sticking.
- Place the chopped chocolate in a microwave-safe bowl. Melt in 30-second intervals, stirring between each, until smooth.
- Hold a strawberry by the stem and dip it into the melted chocolate. Twist to coat, letting excess drip off.
- Place the dipped strawberry on a baking sheet lined with parchment paper. Let the chocolate set at room temperature or in the refrigerator.
Notes
- Use room-temperature berries for best results.
- For decoration, drizzle with a different type of chocolate before the coating sets.
- Store leftovers in a single layer in the refrigerator for up to two days.
- Prep Time: 15 minutes
- Cook Time: 5 minutes
- Category: Dessert
- Method: No-Bake
- Cuisine: American
Nutrition
- Serving Size: 1 strawberry
- Calories: 55
- Sugar: 6g
- Sodium: 1mg
- Fat: 3g
- Saturated Fat: 2g
- Unsaturated Fat: 1g
- Trans Fat: 0g
- Carbohydrates: 7g
- Fiber: 1g
- Protein: 0.5g
- Cholesterol: 0mg