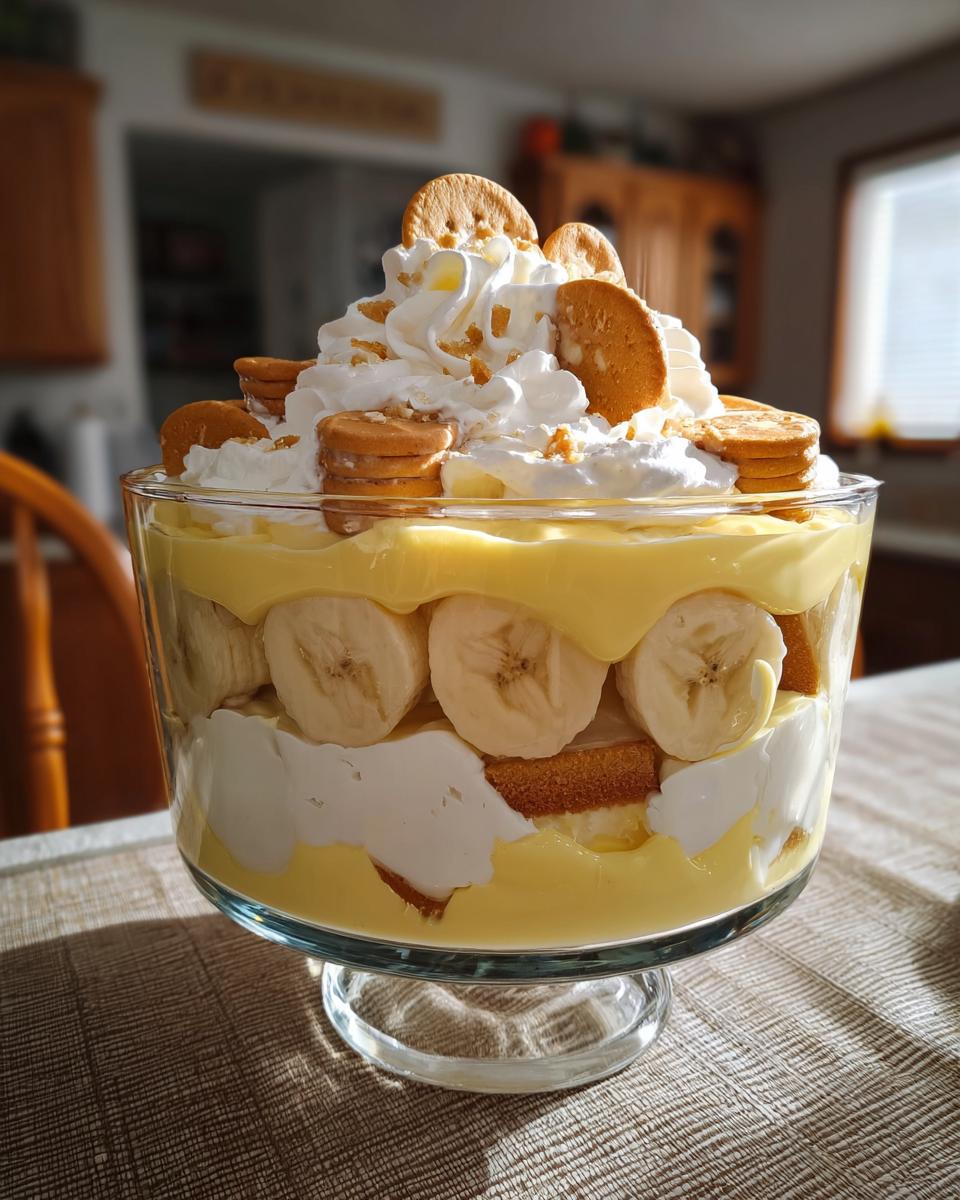
Now let me tell you about my absolute favorite dessert – banana pudding! This classic Southern treat has been my go-to for potlucks and family gatherings since I was old enough to lick the spoon. There’s something magical about those layers of creamy vanilla pudding, fresh bananas, and crispy vanilla wafers that just makes people happy.
I’ve made this recipe more times than I can count, tweaking it here and there until I got it just right. The best part? Even when I’m rushing around before a party, I can throw this together in minutes. No oven required! Just wait until you see how the flavors meld together after chilling – it’s like a sweet, comforting hug in dessert form.
Why You’ll Love This Banana Pudding
Oh my goodness, where do I even start? This banana pudding recipe has stolen hearts at every gathering I’ve brought it to. Let me gush about why it’s so special:
- Effortless magic: No baking means you can whip it up in minutes – perfect for when surprise guests show up!
- Creamy dreaminess: That silky-smooth pudding texture with fresh banana slices? Pure bliss in every bite.
- Instant crowd-pleaser: Kids go nuts for it, grandparents reminisce about it – nobody can resist seconds.
- Nostalgia in a bowl: One taste and you’re transported back to childhood summers and family picnics.
Trust me, once you try this version, you’ll never go back to store-bought banana pudding again!
Banana Pudding Ingredients
Alright, let’s gather our simple but magical ingredients! Every single one plays a special role in creating that perfect banana pudding texture and flavor we all crave. Here’s what you’ll need:
- 3 cups whole milk – The base of our creamy pudding (2% works in a pinch, but whole milk gives that luxurious mouthfeel)
- 1 (5 oz) package instant vanilla pudding mix – Our shortcut to perfect consistency every time
- 1 (14 oz) can sweetened condensed milk – The secret weapon for that rich, dreamy sweetness
- 1 tbsp vanilla extract – Use the real stuff, not imitation – it makes all the difference!
- 1 (12 oz) container whipped topping, thawed – Makes the pudding light as a cloud
- 4 ripe bananas, sliced – Look for bananas with small brown spots for maximum flavor
- 1 (11 oz) box vanilla wafers – The classic crunchy layer we all love (Nilla Wafers are my go-to)
Pro tip: If you’re feeling adventurous, grab an extra banana for garnish – those pretty slices on top make everyone’s eyes light up!
Equipment You’ll Need
One of the best things about this banana pudding? You probably already have everything you need right in your kitchen! Here’s the short and sweet list:
- Large mixing bowl – For whipping up that creamy pudding goodness
- Whisk – To get everything perfectly smooth (a fork works in a pinch!)
- Serving dish – I love using a glass trifle bowl so everyone can see those beautiful layers
- Spatula – Helps spread each layer evenly without making a mess
See? Told you it was simple! Now let’s get to the fun part – making the pudding!
How to Make Banana Pudding
Okay, let’s dive into the fun part – making this dreamy banana pudding! I promise it’s easier than you think, and the layering is where the magic happens. Here’s exactly how I do it:
Step 1: Grab that big mixing bowl and whisk together the milk, pudding mix, and sweetened condensed milk until it’s silky smooth. No lumps allowed! This takes about 2 minutes of good whisking – your arm will get a little workout, but trust me, it’s worth it.
Step 2: Stir in that glorious vanilla extract (take a whiff – heavenly, right?), then gently fold in half of the whipped topping. I like to use a spatula and make big, slow folds – we want fluffy clouds, not deflated pudding!
Step 3: Now for the layering! Start with vanilla wafers covering the bottom of your dish. Next comes a layer of banana slices (I overlap them slightly). Then spoon on a generous layer of pudding. Repeat until you run out of ingredients, ending with pudding on top.
Step 4: Dollop the remaining whipped topping over everything and smooth it out like you’re frosting a cake. Pop it in the fridge for at least 4 hours – I know it’s hard to wait, but this chill time lets all the flavors become best friends!
Pro tip: For picture-perfect layers, press some extra wafers vertically around the sides of your dish before adding the final whipped topping. Makes it look bakery-worthy!
Tips for the Best Banana Pudding
After making this recipe dozens of times, I’ve picked up some tricks that take banana pudding from good to “Oh my gosh, can I have the recipe?” good:
- Banana ripeness is key: Wait until they’ve got those cute little brown freckles – that’s when they’re perfectly sweet and creamy.
- Patience pays off: If you can resist digging in, chilling overnight makes the texture absolutely dreamy as the wafers soften just right.
- Presentation matters: Right before serving, I love adding a crown of extra wafers and fresh banana slices – it makes people feel special!
One more secret? Always make extra – this stuff disappears faster than you’d think!
Serving and Storage
Here’s the beautiful thing about banana pudding – it’s meant to be served nice and chilled! I always pull mine straight from the fridge and give everyone generous scoops so they get all those dreamy layers in each bite. Leftovers (if you’re lucky enough to have any!) keep perfectly in an airtight container for 2-3 days. Just press plastic wrap directly on the surface to keep those bananas from browning. Though between you and me? It never lasts that long in my house!
Banana Pudding Variations
Now don’t get me wrong – the classic version is perfection, but sometimes I love playing around with fun twists! Here are my favorite ways to mix things up:
- Caramel dream: Drizzle warm caramel sauce between layers – the salty-sweet combo with bananas is unreal!
- Cookie swap: Try shortbread cookies instead of vanilla wafers for a richer, buttery crunch.
- Tropical vibes: Use coconut milk and top with toasted coconut flakes for a dairy-free delight.
- Chocolate lover’s: Add a layer of chocolate pudding or crushed chocolate graham crackers.
The best part? You can customize it however you like – that’s the beauty of homemade banana pudding!
Banana Pudding FAQs
I get asked about banana pudding almost every time I serve it – and trust me, I’ve heard every question under the sun! Here are the answers to the ones that pop up most often:
Can I use homemade pudding instead of instant?
Absolutely! If you’ve got a favorite homemade vanilla pudding recipe, go for it. Just make sure it’s chilled and thickened before layering. I sometimes do this for special occasions – though I’ll admit, the instant mix is my weekday lifesaver!
How do I keep the bananas from turning brown?
The pudding actually helps protect them, but for extra insurance, you can toss banana slices in a little lemon or pineapple juice before layering. Or do what I do – assemble right before serving and watch it disappear before browning has a chance!
Can banana pudding be frozen?
Here’s the truth – the texture changes when frozen and thawed. The bananas get mushy and the wafers turn soggy. I don’t recommend it for the full dessert, but you can freeze just the pudding mixture for up to a month!
Can I make this ahead of time?
You bet! In fact, it’s better when it sits overnight. Just hold off on the final whipped topping layer – add that right before serving so it stays fluffy and pretty.
Nutritional Information
Just a quick note – these numbers are estimates based on standard ingredients. Your exact nutrition may vary depending on brands and any tweaks you make. One serving (about 1 cup) comes out to roughly 320 calories with 10g fat and 28g sugar – sweet enough to satisfy but not over-the-top decadent. Remember, homemade always lets you control what goes in!
Did You Make This Recipe?
I’d love to hear how your banana pudding turned out! Leave a comment below or snap a photo – nothing makes me happier than seeing your creations!
Print
Irresistible Banana Pudding Recipe That Takes Just 5 Minutes
- Total Time: 4 hours 20 minutes
- Yield: 8 servings 1x
- Diet: Vegetarian
Description
A creamy and delicious dessert made with layers of vanilla pudding, fresh bananas, and vanilla wafers.
Ingredients
- 3 cups whole milk
- 1 (5 oz) package instant vanilla pudding mix
- 1 (14 oz) can sweetened condensed milk
- 1 tbsp vanilla extract
- 1 (12 oz) container whipped topping, thawed
- 4 bananas, sliced
- 1 (11 oz) box vanilla wafers
Instructions
- In a bowl, whisk together milk, pudding mix, and sweetened condensed milk until smooth.
- Stir in vanilla extract and fold in half of the whipped topping.
- Layer vanilla wafers, banana slices, and pudding mixture in a serving dish.
- Repeat layers, finishing with a layer of pudding.
- Top with remaining whipped topping and refrigerate for at least 4 hours before serving.
Notes
- Use ripe bananas for the best flavor.
- For a firmer texture, chill overnight.
- Add extra vanilla wafers as garnish if desired.
- Prep Time: 20 minutes
- Cook Time: 0 minutes
- Category: Dessert
- Method: No-Bake
- Cuisine: American
Nutrition
- Serving Size: 1 cup
- Calories: 320
- Sugar: 28g
- Sodium: 210mg
- Fat: 10g
- Saturated Fat: 6g
- Unsaturated Fat: 3g
- Trans Fat: 0g
- Carbohydrates: 52g
- Fiber: 2g
- Protein: 5g
- Cholesterol: 15mg