Okay, so I have to tell you about this Spring Asparagus Tart. It’s my absolute favorite way to celebrate when those first skinny, bright green spears show up at the market. I get so excited, I usually buy way too many bunches—my fridge looks like a forest by mid-April!
This tart is my secret weapon. It looks like you spent all day in the kitchen, but trust me, it comes together in about the time it takes to preheat your oven. I’ve made this for book club, lazy Sunday lunches, and even as a fancy appetizer for dinner parties, and every single time, someone asks for the recipe. The magic is in how simple it really is: a crispy, buttery puff pastry base, a creamy lemony cheese layer, and those gorgeous roasted asparagus spears on top. After testing it more times than I can count (my neighbors have been very happy taste-testers!), I can promise you it’s foolproof. It’s the kind of dish that makes everyone feel special, without making you feel stressed.
Why You Will Love This Spring Asparagus Tart
Honestly, this tart is a game-changer. Once you try it, you’ll see why it’s become my go-to. Here’s what makes it so special:
- It’s incredibly fast. From fridge to table in about 40 minutes. The puff pastry does all the hard work, puffing up into a gorgeous, flaky crust with almost no effort from you.
- It looks stunning. Arranging those bright green asparagus spears is so satisfying. When you pull this golden, veggie-topped tart out of the oven, people will think you’re a culinary genius.
- It works for any occasion. Slice it for an elegant appetizer, pair it with a simple salad for a light lunch, or serve big wedges as a vegetarian main. It’s perfect warm or at room temperature, which is a host’s dream.
- It tastes like spring. The fresh, grassy asparagus and that zing of lemon zest just sing. It’s a delicious way to celebrate the best produce of the season.
Spring Asparagus Tart Ingredients
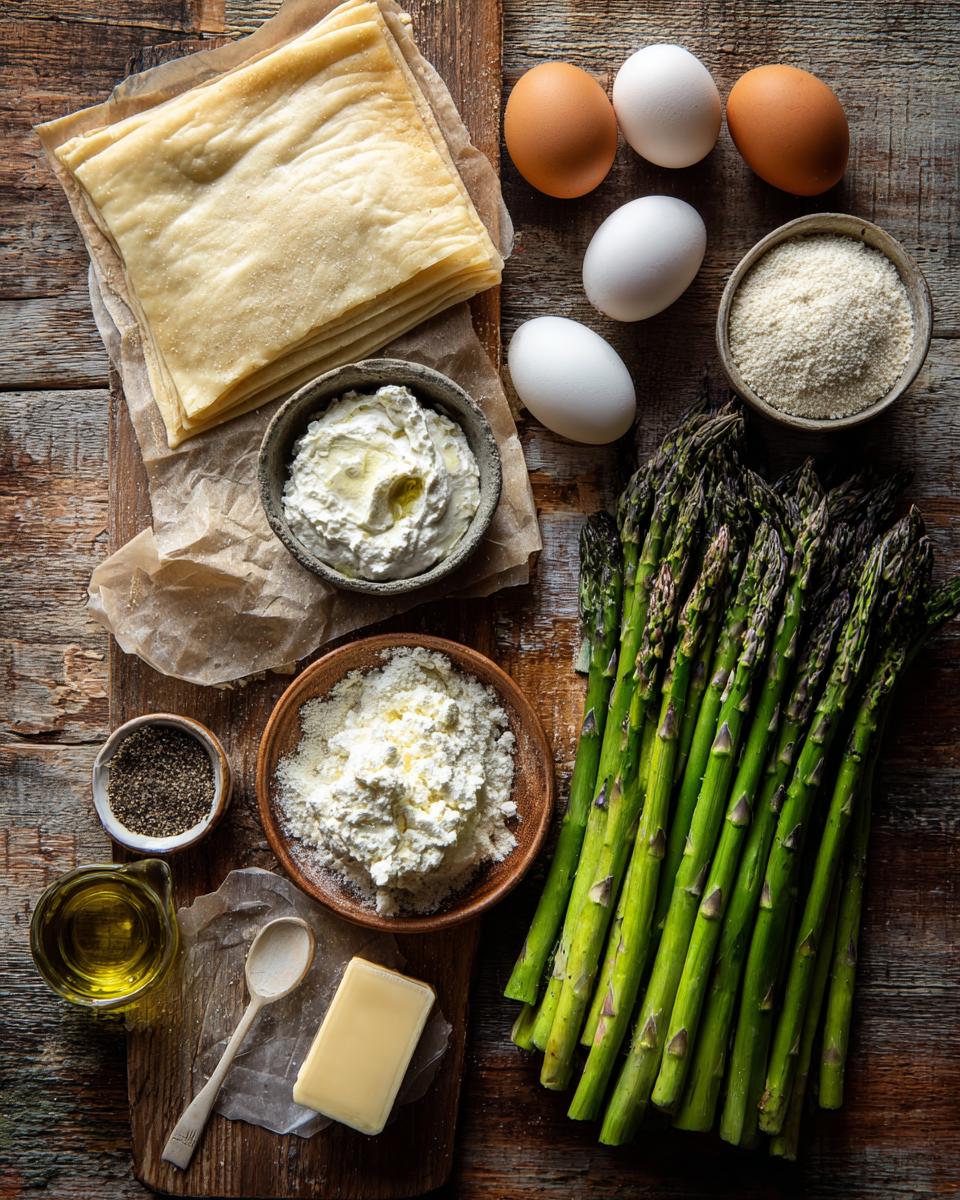
Gathering your ingredients is the first step to tart happiness, and I promise this list is short and sweet. Here’s exactly what you’ll need:
- 1 sheet puff pastry, thawed according to package directions
- 1 bunch fresh asparagus (about 1 pound), woody ends trimmed
- 1 cup ricotta cheese
- 1/2 cup grated Parmesan cheese (finely grated, please!)
- 1 large egg
- 2 tablespoons olive oil
- 1 teaspoon lemon zest
- 1/2 teaspoon freshly cracked black pepper
- 1/4 teaspoon salt
Ingredient Notes for Your Spring Asparagus Tart
Okay, let’s chat about these ingredients, because a few little choices here make a big difference. First, the cheese: full-fat ricotta is my non-negotiable. The low-fat stuff can be watery and won’t give you that lush, creamy layer. If you’re not a ricotta fan, an equal amount of soft goat cheese is a fantastic, tangy swap—just mash it up well.
For the Parmesan, the pre-grated stuff in a tub works in a pinch, but I always notice a better flavor when I take a minute to finely grate a block myself. It melts into the filling so much more smoothly.
Now, the star: the asparagus! Try to find thin to medium spears. They cook perfectly in the same time it takes for the pastry to get golden and crisp. Thick spears can stay a bit too crunchy. And don’t toss those trimmed ends! I save them for soups or a quick veggie sauté later.
Equipment You Need
Here’s the best part—you don’t need any fancy gadgets for this spring asparagus tart. I bet you have everything already! Just grab these basic kitchen tools:
- A large baking sheet (no need for a special tart pan)
- A rolling pin to gently even out your pastry
- One medium mixing bowl and a fork or whisk for the creamy cheese filling
- A good knife and a cutting board for prepping the asparagus
That’s seriously it. See? I told you this was easy. Now let’s get to the fun part—making it!
How to Make a Spring Asparagus Tart
Alright, let’s get to the best part! Making this tart is honestly more fun than it is work. I’ve broken it down into three simple stages: getting your base ready, putting it all together, and the very important step of eating it. Just follow along, and you’ll have something gorgeous in no time.
Prepare the Pastry and Filling
First things first: turn that oven on to 400°F (200°C). Trust me, you want it nice and hot when your tart goes in. Now, take your thawed puff pastry sheet and lay it on your baking sheet. I like to give it a few gentle rolls with my pin just to even it out and smooth any seams. Then, use a knife to score a line about an inch from the edge all the way around—don’t cut all the way through! This creates a little border that will puff up beautifully.
While that’s sitting, grab your bowl. In goes the ricotta, Parmesan, that whole egg, lemon zest, pepper, and salt. Now, mix it! Really get in there with a fork or whisk until it’s completely smooth and creamy. You don’t want any big lumps of ricotta. This cheesy, lemony cloud is what’s going to hold your asparagus perfectly in place.
Assemble and Bake Your Spring Asparagus Tart
Here’s where it starts to look real. Take your cheese mixture and spread it evenly inside the border you made on the pastry. Be gentle so you don’t tear the dough. Now, for the fun artistic bit: your asparagus spears. I like to lay them down side-by-side, alternating tips and ends so they fit nicely. You can go all in one direction for a cleaner look, or get a little wild and criss-cross them!
Once they’re arranged, drizzle the whole thing with the olive oil. This helps the asparagus roast and get those lovely little crispy bits. Pop it in the hot oven and just walk away for 20-25 minutes. You’ll know it’s done when the pastry border is deep golden and puffed, the asparagus is tender, and your kitchen smells incredible.
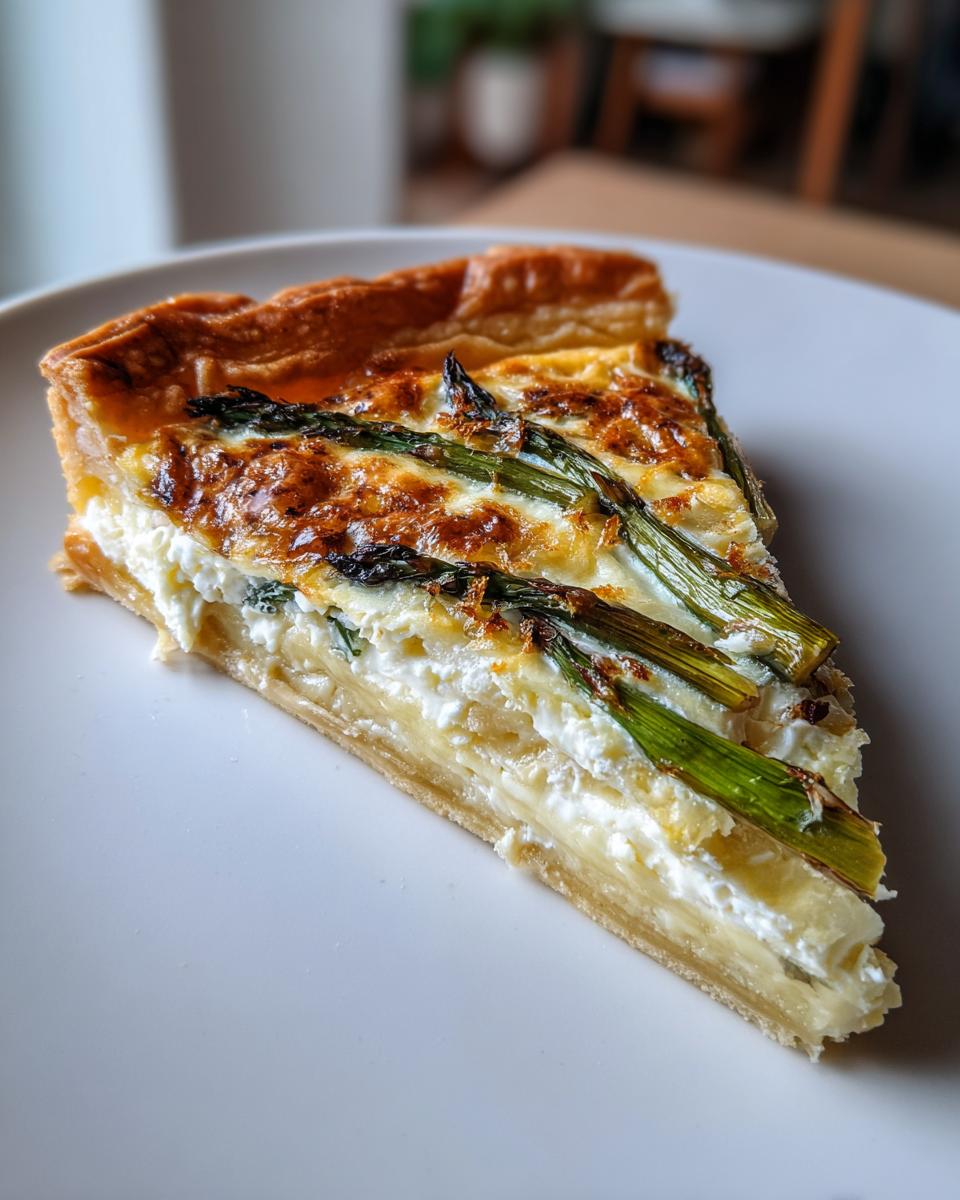
Serving Your Spring Asparagus Tart
This is crucial: let it cool on the baking sheet for at least 5-10 minutes. I know it’s hard to wait, but this lets the cheesy filling set a bit so you get clean slices. Then, slide it onto a cutting board. A little extra lemon zest or a sprinkle of fresh herbs like chives or dill on top makes it look (and taste) even more special. Slice it up and serve it warm. It’s perfect just like that!
Tips for the Best Spring Asparagus Tart
I’ve made this tart so many times I’ve learned a few little tricks that take it from great to absolutely perfect. My number one tip? Pat your asparagus dry after you rinse it. Any extra water can make the pastry underneath a bit soggy, and we want that base crisp!
Here’s my secret for the crispiest crust: after you assemble the whole tart, pop the baking sheet into the fridge for about 10-15 minutes before baking. A quick chill firms up the pastry fat again, so it puffs up even better in the hot oven. It makes a real difference.
And for that gorgeous, glossy golden border? Before you add the filling, beat an extra egg yolk with a teaspoon of water and brush it lightly on the scored edge. This simple egg wash gives it a beautiful color and a little extra crunch. Trust me, these tiny steps make your spring asparagus tart look and taste totally pro!
Spring Asparagus Tart Variations
The best part about this recipe is how easily you can make it your own! Once you’ve mastered the basic spring asparagus tart, try one of these simple twists. They’re all delicious.
For a touch of sweet, savory depth, spread a layer of caramelized onions over the pastry before adding the cheese mixture. It takes a little extra time, but oh my goodness, it’s worth it. If you want something heartier, crisp up some beef bacon and crumble it over the baked tart right before serving—the salty crunch is incredible. And my favorite easy upgrade? Stir a handful of fresh chopped herbs right into the ricotta. Dill, chives, or even a little thyme make the whole thing taste even more like spring.
Storing and Reheating Your Tart
Okay, let’s be real—this spring asparagus tart is usually gone in one sitting at my house. But if you’re lucky enough to have a slice or two left, here’s exactly what to do. Let it cool completely, then cover it loosely with foil or pop it in an airtight container. It’ll keep beautifully in the fridge for up to 2 days.
When you’re ready for round two, skip the microwave! Trust me, it’ll turn that crisp crust soggy. Instead, reheat slices in a 350°F oven or a toaster oven for about 5-10 minutes, just until warmed through. It brings back that perfect flaky texture and makes it taste fresh-from-the-oven all over again.
Spring Asparagus Tart Nutritional Information
Just a quick note about the nutrition for this spring asparagus tart—these numbers are always an estimate. It really depends on the specific brands of puff pastry and cheese you use. But as a general guide, one serving gives you a nice bit of protein from the eggs and cheese, and you’re getting those great spring veggies right in there. I think of it as a delicious, balanced treat that feels indulgent but is packed with good stuff too!
Your Spring Asparagus Tart Questions Answered
I get it—you’ve got questions before you dive in! I had all the same ones when I first started making this. So let’s tackle the most common ones right here.
Can you make this tart ahead?
Absolutely, and I do it all the time for parties. You can prep the filling, trim the asparagus, and have your pastry rolled out on the baking sheet a few hours ahead. Just keep everything covered in the fridge, then assemble and bake when you’re ready. The baked tart also holds up well at room temperature for a couple of hours.
What’s the best way to trim asparagus?
Don’t just chop the ends off! Grab one spear and bend it near the bottom. It’ll naturally snap where the tough, woody part ends. Line that one up with the rest of the bunch and cut them all at that same spot. Easy!
Will the pastry get soggy under the filling?
Not if you bake it in a nice hot oven! That high heat sets the cheese layer quickly and puffs the pastry. My pro tip is to make sure your ricotta mixture isn’t too wet (full-fat helps) and to pat those asparagus spears really dry.
Can I use frozen asparagus?
You can, but fresh is really best here. Frozen spears release a lot of water as they thaw, which can make things soggy. If you must use frozen, don’t thaw them—just pat them dry while still frozen and add a few extra minutes to the bake time.
What other cheeses can I use?
Oh, have fun with it! Goat cheese is my favorite swap for the ricotta—it’s so tangy. A soft feta works great too. For the Parmesan, any hard, salty grating cheese like Pecorino Romano is fantastic. It’s your tart, make it taste like you!
Share Your Spring Asparagus Tart Creation
I’d love to hear how your tart turns out! Did you add extra herbs or try the caramelized onions? Please come back and let me know by rating the recipe—it helps other home cooks so much. And if you snapped a photo, share it! Seeing your beautiful creations is my absolute favorite part.
Print
Spring Asparagus Tart
- Total Time: 40 minutes
- Yield: 6 servings 1x
- Diet: Vegetarian
Description
A savory tart with fresh spring asparagus on a crisp pastry base.
Ingredients
- 1 sheet puff pastry, thawed
- 1 bunch fresh asparagus, trimmed
- 1 cup ricotta cheese
- 1/2 cup grated Parmesan cheese
- 1 egg
- 2 tablespoons olive oil
- 1 teaspoon lemon zest
- 1/2 teaspoon black pepper
- 1/4 teaspoon salt
Instructions
- Preheat your oven to 400°F (200°C).
- Roll out the puff pastry on a baking sheet.
- Mix ricotta, Parmesan, egg, lemon zest, pepper, and salt in a bowl.
- Spread the cheese mixture over the pastry, leaving a border.
- Arrange the asparagus spears on top.
- Drizzle with olive oil.
- Bake for 20-25 minutes until golden.
- Let cool slightly before serving.
Notes
- Use thin asparagus for quicker cooking.
- You can add chopped herbs to the cheese mix.
- Serve warm or at room temperature.
- Prep Time: 15 minutes
- Cook Time: 25 minutes
- Category: Appetizer
- Method: Baking
- Cuisine: French-inspired
Nutrition
- Serving Size: 1 slice
- Calories: 320
- Sugar: 3g
- Sodium: 380mg
- Fat: 22g
- Saturated Fat: 8g
- Unsaturated Fat: 12g
- Trans Fat: 0g
- Carbohydrates: 20g
- Fiber: 2g
- Protein: 11g
- Cholesterol: 55mg