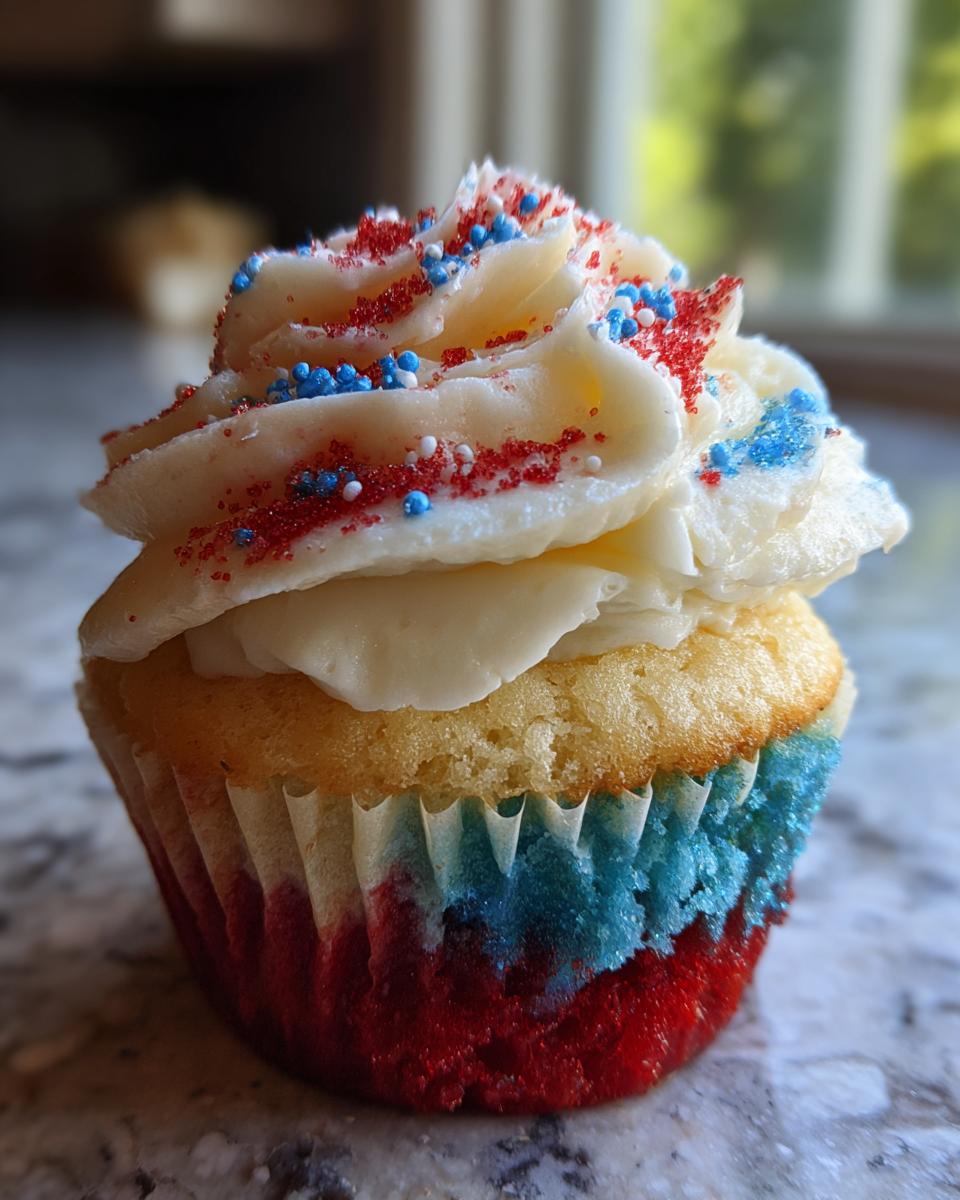
Nothing says “celebration” quite like red white and blue cupcakes! I first made these for my daughter’s Fourth of July party, and now they’re our family’s go-to patriotic treat. The vibrant colors make everyone smile, and the best part? They’re surprisingly simple to throw together. Whether it’s Memorial Day, Flag Day, or just because you’re feeling festive, these little cakes bring the party wherever they go.
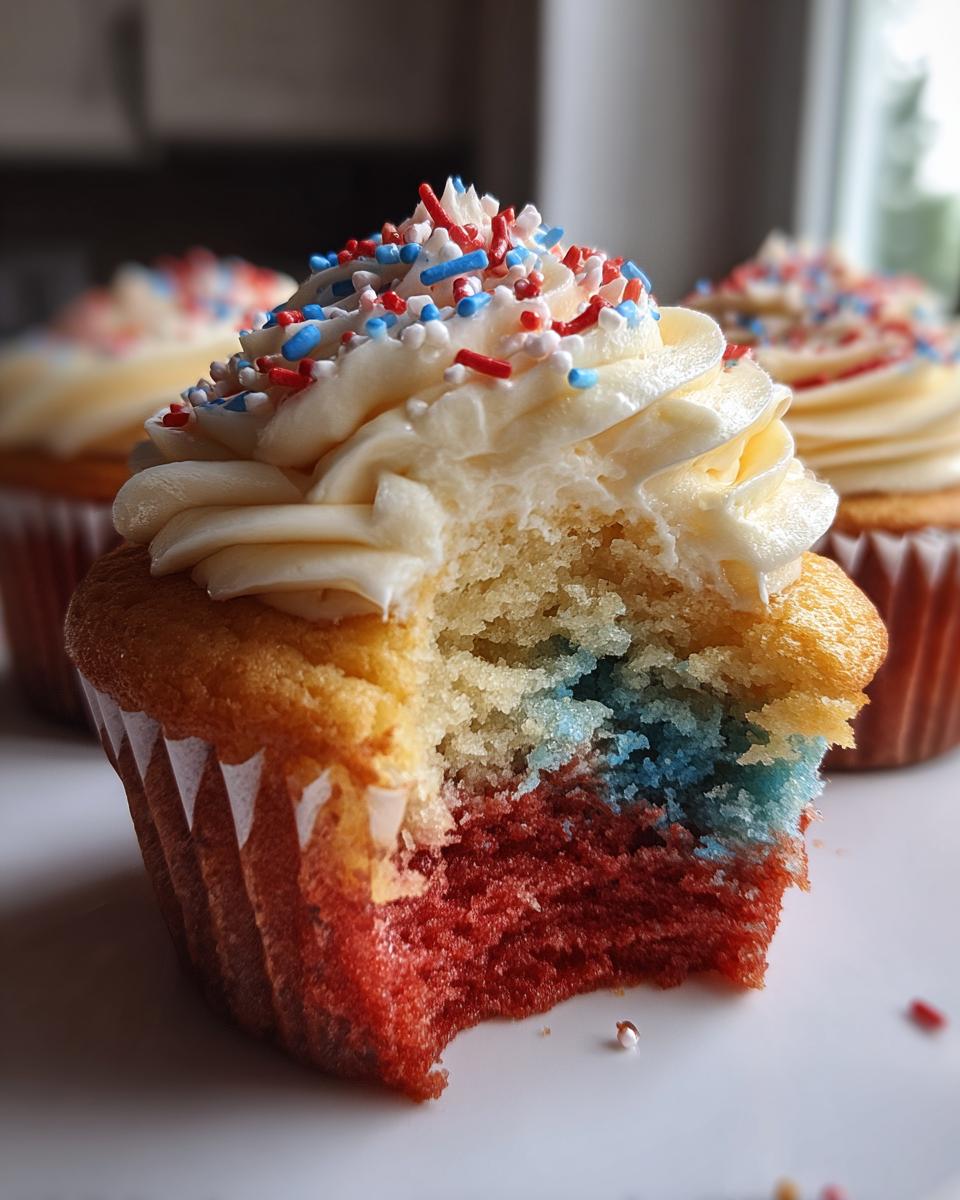
I’ll never forget the first time I pulled a batch from the oven – that perfect swirl of colors peeking through the liners made me feel like a baking wizard. My secret? Using gel food coloring for those bold, bakery-style hues without watering down the batter. Trust me, once you see how easy these are, you’ll be making them for every summer gathering too!
Why You’ll Love These Red White and Blue Cupcakes
These cupcakes aren’t just pretty – they’re pure magic for any celebration! Here’s why they’ll become your new favorite:
- Easy as pie: Seriously, if you can make basic cupcakes, you can make these. The color-swirling is way simpler than it looks!
- Showstopper colors: That patriotic swirl peeking through the liners? Instant party vibes every time.
- Crowd-pleaser: Kids go nuts for the colors, adults love the classic vanilla taste – total win-win.
- Perfect for any patriotic holiday: Fourth of July? Memorial Day? Flag Day? These bad boys work for them all.
I’ve brought these to countless summer BBQs and they always disappear first. The best part? Watching people’s faces light up when they bite into that colorful surprise!
Ingredients for Red White and Blue Cupcakes
Gather these simple ingredients – you probably have most in your pantry already! The magic happens when they come together:
- 1 1/2 cups all-purpose flour: Spoon it in and level it off – no packing!
- 1 tsp baking powder: Fresh is best here – check that expiration date.
- 1/4 tsp salt: Just a pinch to balance the sweetness.
- 1/2 cup unsalted butter, softened: Leave it out for 30 minutes – it should dent when pressed but not melt.
- 3/4 cup granulated sugar: Regular white sugar works perfectly.
- 2 large eggs: Room temperature helps them incorporate smoothly.
- 1 tsp vanilla extract: Real vanilla makes all the difference.
- 1/2 cup whole milk: The fat content gives better texture.
- Red and blue gel food coloring: I swear by gel – liquid makes batter too thin.
- 1 cup vanilla frosting: Store-bought works great, but homemade’s even better!
See? Nothing too fancy – just quality basics that transform into something spectacular. Now let’s get mixing!
Equipment You’ll Need
Don’t worry – you don’t need any fancy gadgets for these beauties! Just grab:
- 12-cup muffin tin – standard size works perfectly
- Cupcake liners – I love the patriotic-themed ones!
- Mixing bowls – one large, two medium for color dividing
- Electric mixer – or strong arms and a whisk if you’re feeling energetic
- Spatula – for scraping every last bit of batter
- Piping bag & tip – or just a knife for spreading frosting
That’s it – see? Told you it was simple. Now let’s make some magic happen!
How to Make Red White and Blue Cupcakes
Alright, let’s dive in! These cupcakes come together so easily once you get the rhythm. I’ll walk you through each step – just follow along and you’ll have perfect patriotic treats in no time.
Preparing the Batter
First things first – preheat that oven to 350°F and line your muffin tin with those cute liners. Trust me, you don’t want to be scrambling with batter-filled hands later!
In a medium bowl, whisk together the flour, baking powder, and salt. Set this aside – we’ll come back to it. Now, in your large mixing bowl, cream the softened butter and sugar until it’s light and fluffy (about 2 minutes with a mixer). This step is crucial for that perfect cupcake texture!
Add eggs one at a time, mixing well after each. Splash in that vanilla – oh, that smell already takes me back to summer cookouts! Now, alternate adding the dry ingredients and milk, starting and ending with the dry mix. I do three additions of dry and two of milk. Stop mixing as soon as everything’s combined – overmixing makes tough cupcakes.
Coloring and Layering the Batter
Here’s the fun part! Divide the batter evenly between three bowls (I use a kitchen scale to be precise). Leave one bowl plain white, then add red gel coloring to another and blue to the third. Stir each until you get vibrant, even colors – don’t be shy with the gels!
Now, layer about 1 tablespoon of each color into each liner. I like doing red first, then white, then blue for that perfect patriotic look. Pro tip: use a small cookie scoop for neat layers. The colors will swirl beautifully as they bake!
Baking and Cooling
Pop those beauties in the oven for 18-20 minutes. They’re done when a toothpick comes out with moist crumbs (no wet batter). Don’t overbake – we want them moist!
Let them cool in the pan for 5 minutes, then transfer to a wire rack. Here’s where patience comes in – they must be completely cool before frosting or you’ll have a melty mess. I know it’s hard to wait when they smell this good!
Frosting and Decorating
Now for the grand finale! Pipe or spread on that vanilla frosting. I use a star tip for pretty swirls, but a simple spread with a knife works too. Top with red, white, and blue sprinkles or little star-shaped candies for extra patriotic flair.
There you have it – showstopping cupcakes that’ll have everyone asking for the recipe. Just wait till you see those colorful layers when someone takes that first bite – pure magic!
Tips for Perfect Red White and Blue Cupcakes
After years of making these cupcakes (and a few colorful disasters!), I’ve learned some tricks to guarantee perfect results every time:
Gel food coloring is your best friend – liquid colors water down the batter and give you pastel shades when you want fireworks. Just a toothpick dip of gel creates those bold patriotic hues!
Mix gently – stop stirring as soon as the flour disappears. Overmixed batter makes dense, tunnel-ridden cupcakes instead of the light, fluffy clouds we want.
Room temp ingredients matter – cold eggs or milk can make the batter curdle. Take everything out about 30 minutes before you start baking.
Layer colors neatly – I use separate spoons for each color to keep them vibrant. A quick tap on the counter settles the layers beautifully before baking.
Variations of Red White and Blue Cupcakes
Once you’ve mastered the basic version, try mixing it up! My family goes wild when I swap the vanilla frosting for cream cheese – that tangy twist is incredible with the sweet cake. For extra crunch, mix red, white, and blue sprinkles right into the batter before baking.
Last summer, I made a berry version using raspberry extract in the red layer and blueberry jam swirled into the blue. The fruit flavors made them taste as patriotic as they looked! Whatever variation you choose, these cupcakes always bring the festive spirit.
Serving and Storing Red White and Blue Cupcakes
These cupcakes taste best the day they’re made – that frosting stays perfectly fluffy! If you must store them (honestly, they rarely last that long in my house), pop them in an airtight container at room temperature for up to 3 days. The colors stay vibrant, and the cake stays moist – just like magic!
For special occasions, I’ll sometimes arrange them on a tiered stand with little American flags stuck in the tops. Total showstopper! Just keep them away from direct sunlight – we don’t want those gorgeous colors fading before the party even starts.
Nutritional Information for Red White and Blue Cupcakes
Here’s the scoop on nutrition – each cupcake has about 240 calories (give or take, depending on your exact ingredients and frosting). Remember, nutrition can vary based on brands and measurements, so consider this a friendly estimate rather than a lab-certified fact!
Frequently Asked Questions About Red White and Blue Cupcakes
I’ve gotten so many questions about these cupcakes over the years – here are the ones that pop up most often!
Can I use liquid food coloring instead of gel?
You can, but trust me – gel works way better! Liquid colors thin out your batter and give you pale, washed-out shades. Gel gives you those bold patriotic colors without changing the batter’s consistency. If you must use liquid, reduce the milk slightly to compensate.
How do I keep the colors from bleeding together?
The secret is in the layering! Make sure each colored portion goes in as a distinct layer – don’t swirl them together before baking. Also, don’t overfill the liners – about 3/4 full is perfect so the colors have room to rise without mixing too much.
Can I make these ahead of time?
Absolutely! Bake them up to 2 days in advance and store unfrosted at room temperature. Frost them the day you’re serving for the freshest taste and prettiest presentation. The colors stay vibrant for days!
What’s the best way to get even layers?
I use a kitchen scale to divide the batter perfectly, then a small cookie scoop (about 1 tablespoon) for each color layer. Tap the pan gently on the counter after filling to settle everything evenly.
3 Simple Steps to Stunning Red White and Blue Cupcakes
- Total Time: 35 mins
- Yield: 12 cupcakes 1x
- Diet: Vegetarian
Description
Festive cupcakes with red, white, and blue colors, perfect for patriotic celebrations.
Ingredients
- 1 1/2 cups all-purpose flour
- 1 tsp baking powder
- 1/4 tsp salt
- 1/2 cup unsalted butter, softened
- 3/4 cup granulated sugar
- 2 large eggs
- 1 tsp vanilla extract
- 1/2 cup whole milk
- Red and blue food coloring
- 1 cup vanilla frosting
Instructions
- Preheat oven to 350°F and line a muffin tin with cupcake liners.
- Whisk flour, baking powder, and salt in a bowl.
- Cream butter and sugar until fluffy. Add eggs one at a time, then vanilla.
- Alternate adding dry ingredients and milk, mixing until smooth.
- Divide batter into three portions. Color one red and one blue, leaving one white.
- Layer batter in liners (red, white, blue) and bake for 18-20 minutes.
- Cool completely before frosting.
- Pipe frosting on cupcakes and decorate with sprinkles.
Notes
- Use gel food coloring for vibrant colors.
- Do not overmix batter to avoid dense cupcakes.
- Let cupcakes cool before frosting to prevent melting.
- Prep Time: 15 mins
- Cook Time: 20 mins
- Category: Dessert
- Method: Baking
- Cuisine: American
Nutrition
- Serving Size: 1 cupcake
- Calories: 240
- Sugar: 18g
- Sodium: 80mg
- Fat: 10g
- Saturated Fat: 6g
- Unsaturated Fat: 3g
- Trans Fat: 0g
- Carbohydrates: 32g
- Fiber: 0.5g
- Protein: 3g
- Cholesterol: 45mg